Our Lightroom-Presets
Image editing like the prosBreathtaking photos at the click of a mouse – these unique filters make it work
As a professional photographer, I constantly work with Presets for Adobe Lightroom (officially actually “Adobe Photoshop Lightroom“, abbreviated “LR”). The presets or filters make my work immensely easier. With a few clicks in Lightroom, I quickly and easily adjust my photos in post-processing – that is, in the digital darkroom. Over the years, I have developed many of my own presets for travel and landscape photography.
In this article I explain what presets are, for who presets are suitable (and for whom not), how to install presets on your computer, laptop or smartphone and what you have to keep in mind when using presets.
I also provide you with 100 filters I’ve developed and tested for travel and landscape photography (here you’ll find my 25 golden tips for stunning landscape photos) for numerous fields of application.
Free presets: We offer you five presets here free for download 😊. So you can try out if the presets fit to your photos and if everything works with the installation.
Are you a blogger or influencer? Then take a look at our partner program.
What are presets
Presets are presets. In Adobe Lightroom, you use Presets (or Presets or Filters, Templates or Looks) to give photos a predefined touch with just a few clicks. Presets store presets such as white balance, contrast, or color tones.
These presets can be installed with a few clicks in your Lightroom version on the laptop, desktop or smartphone and used immediately. I’ll explain how to do that further down in the article.
To use my templates, you need to install Lightroom on your smartphone or computer. For smartphone and tablet users there is a free Lightroom version.
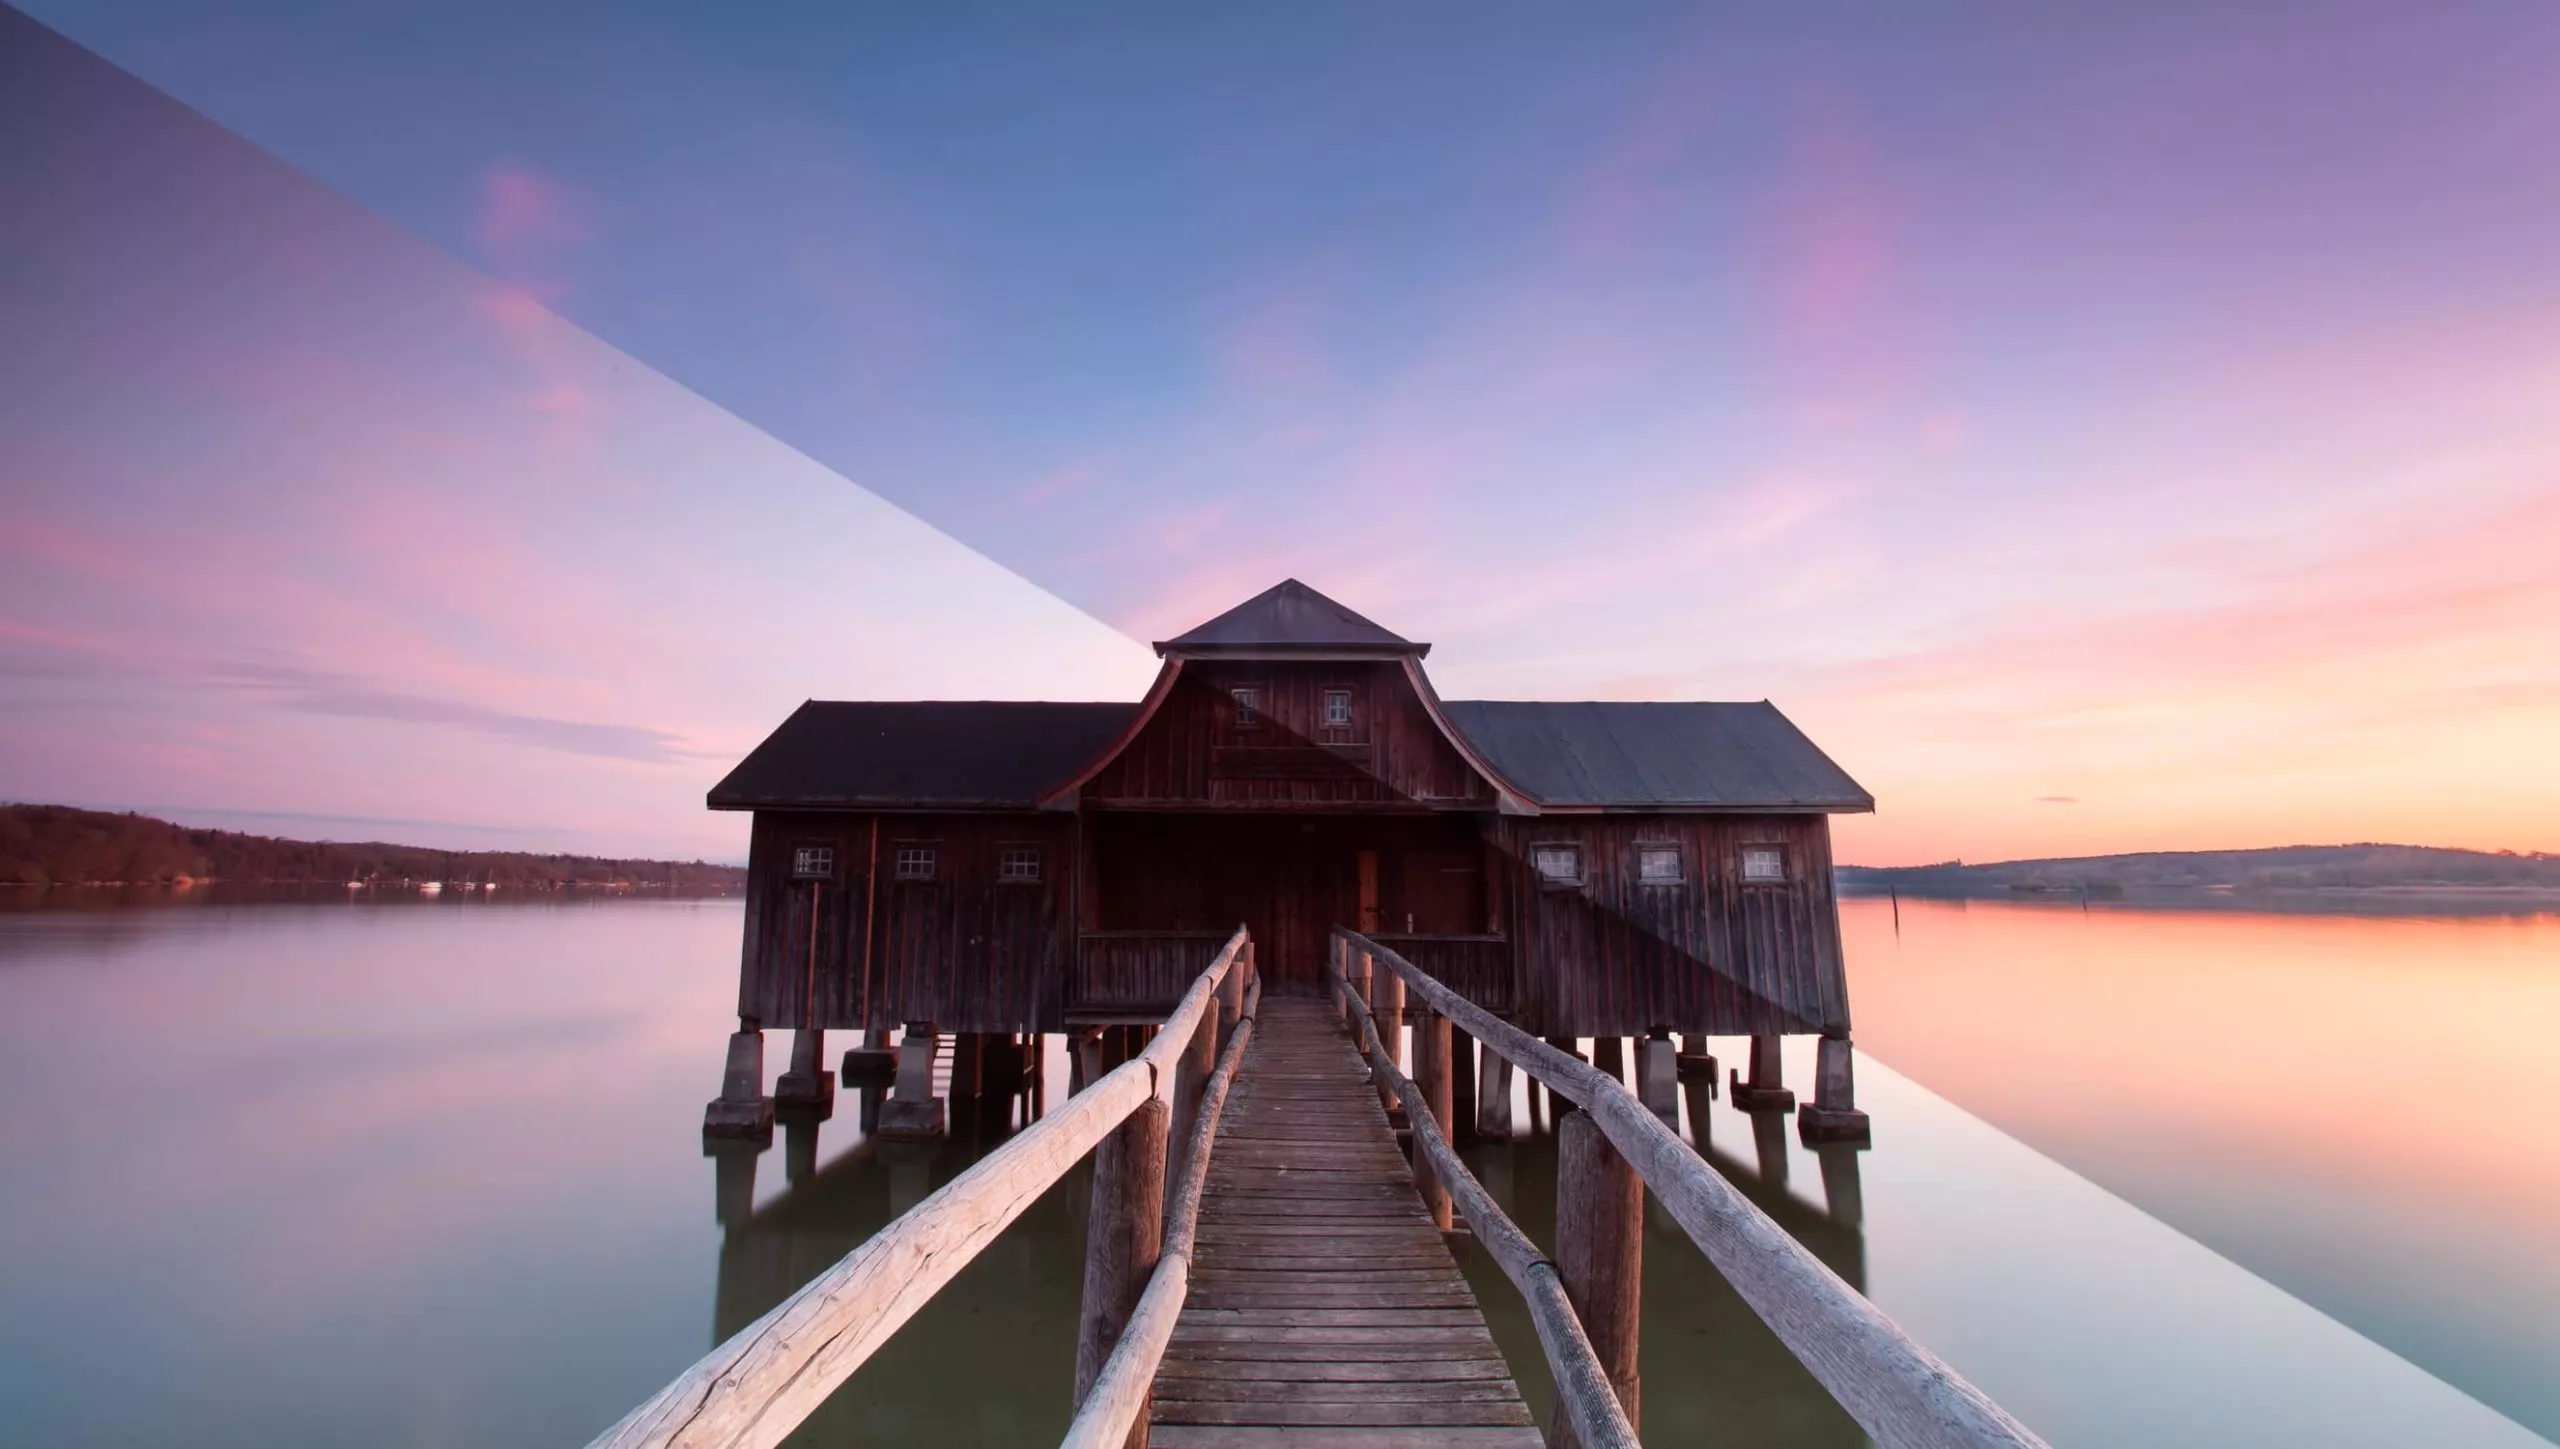
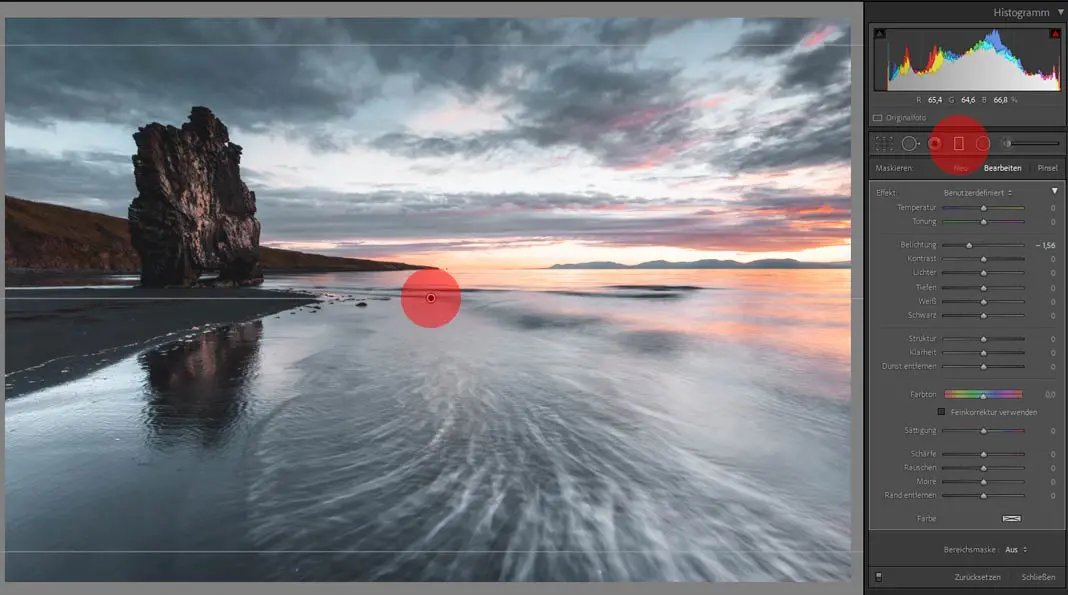
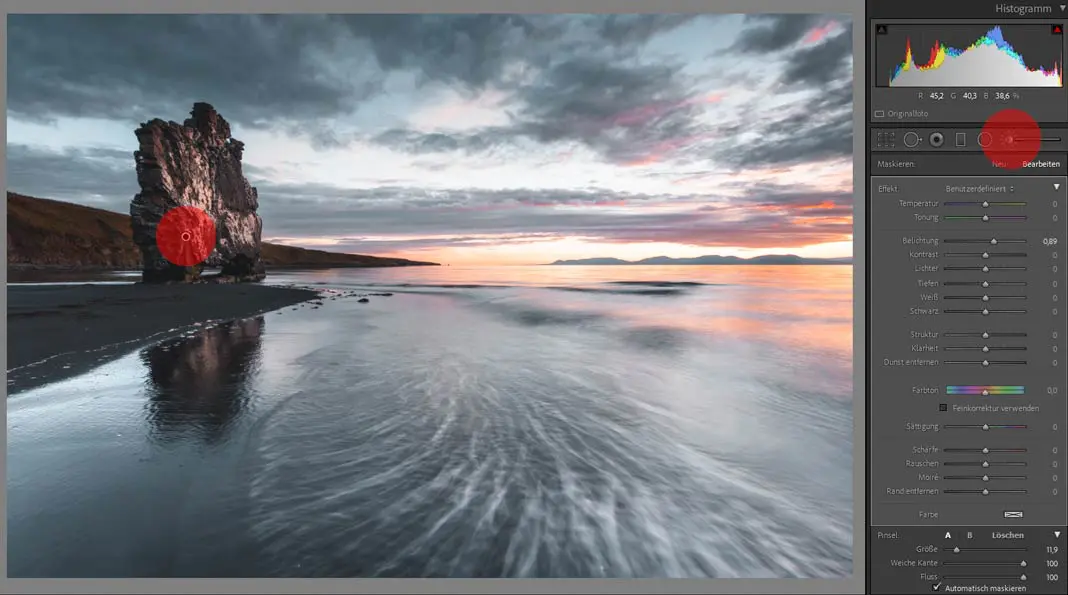
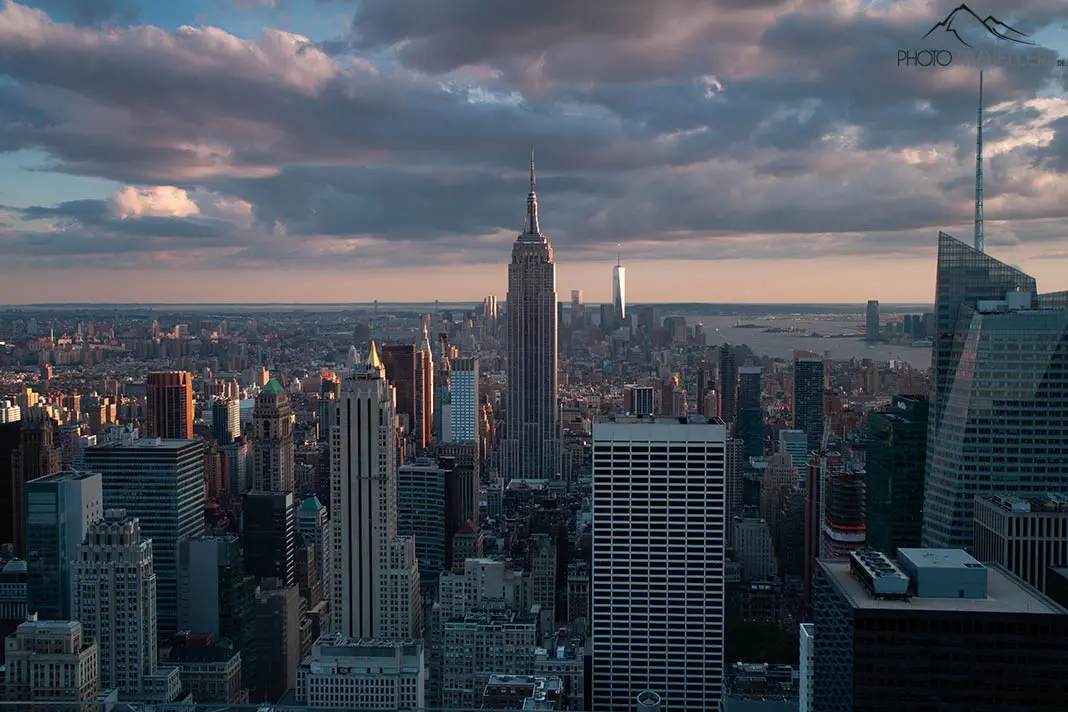
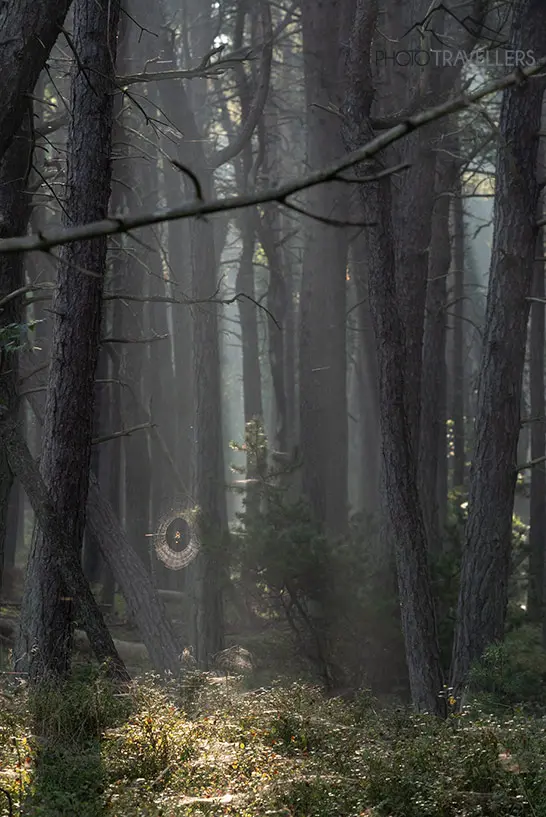
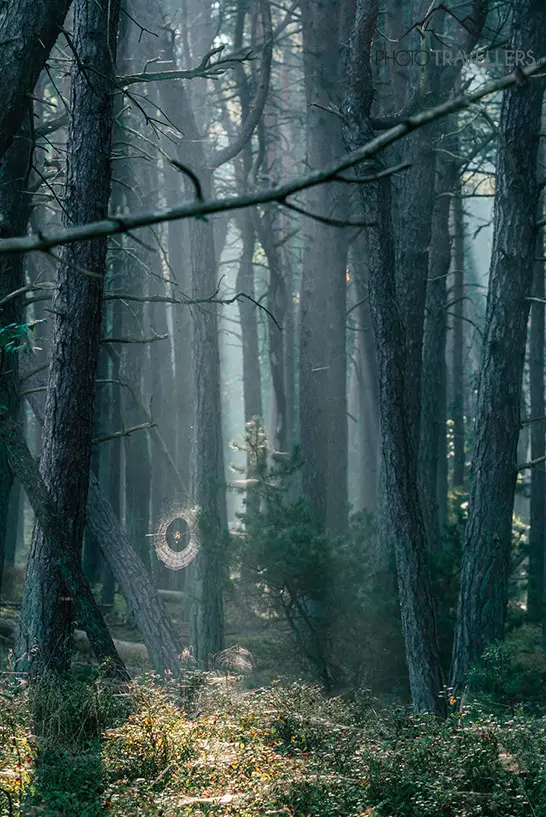
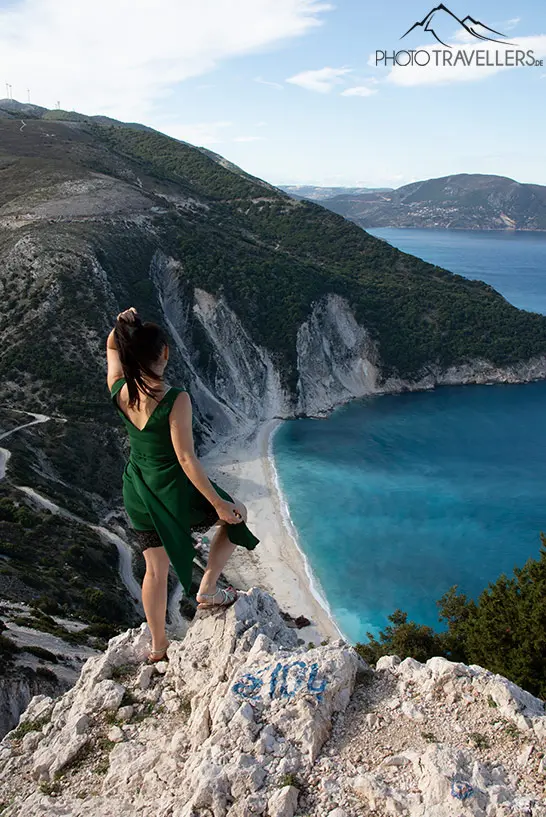
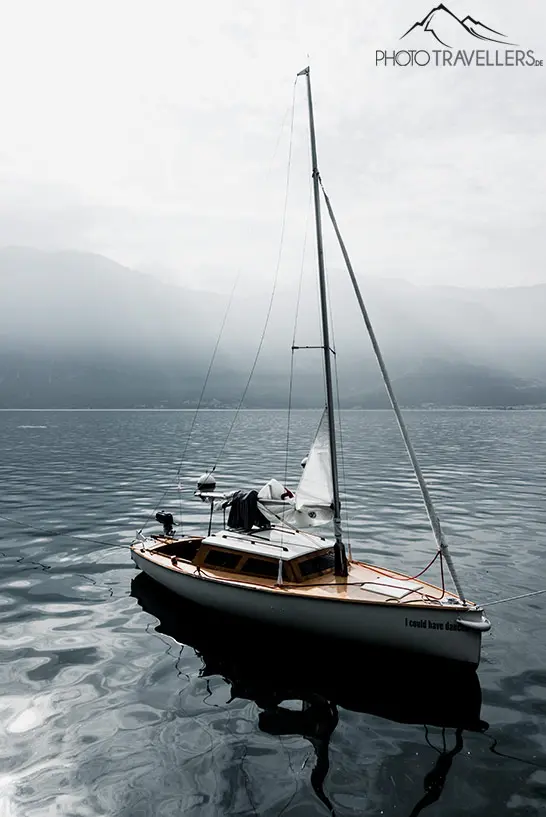
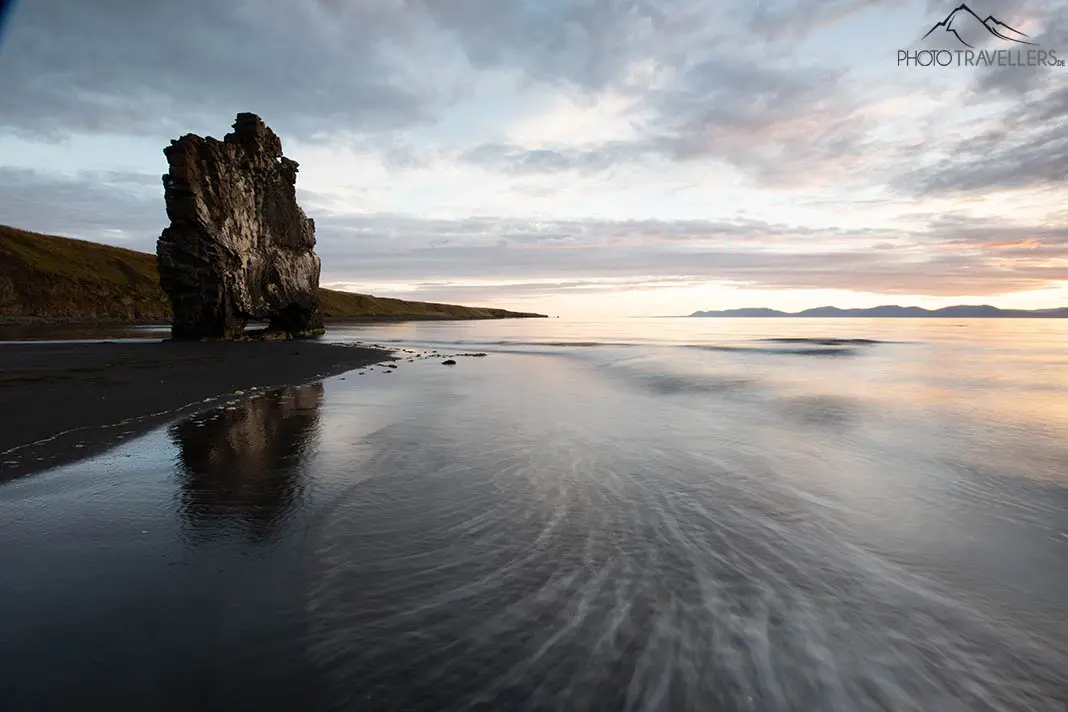
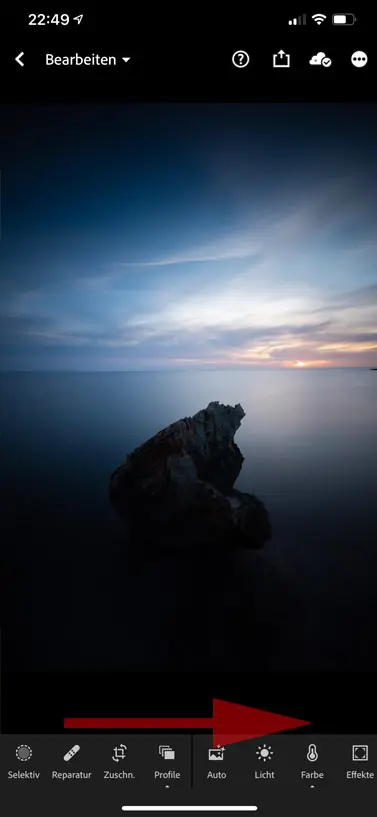
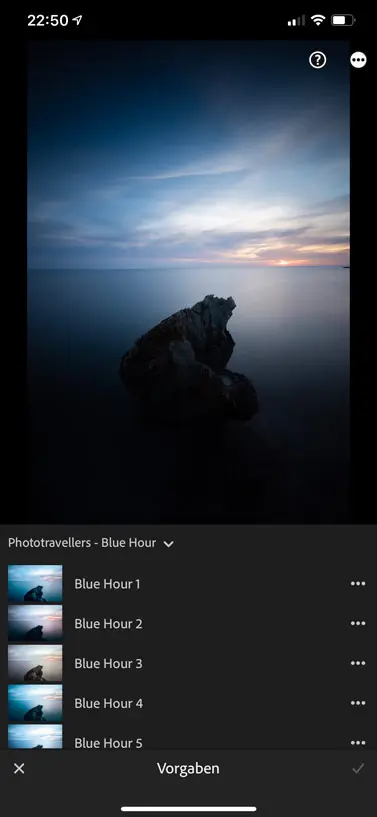
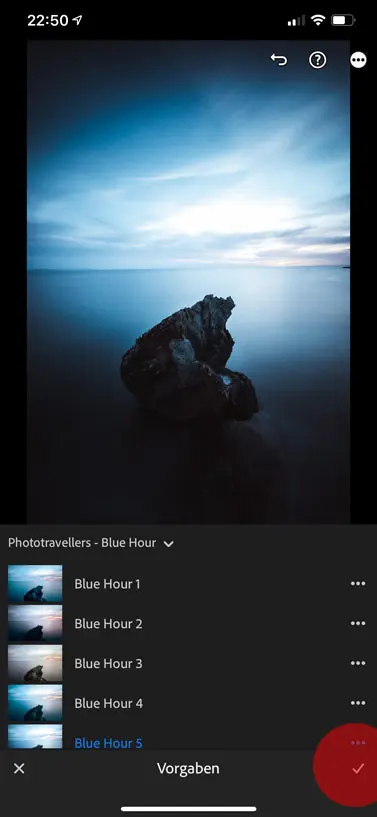
 How the photo came out of the camera
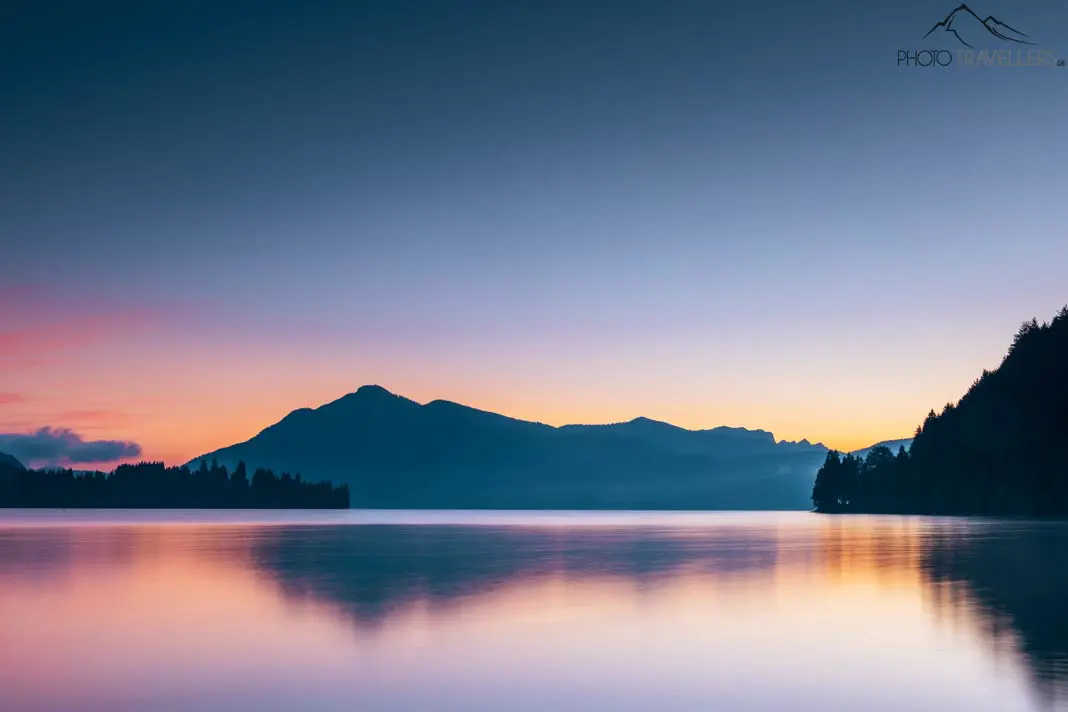
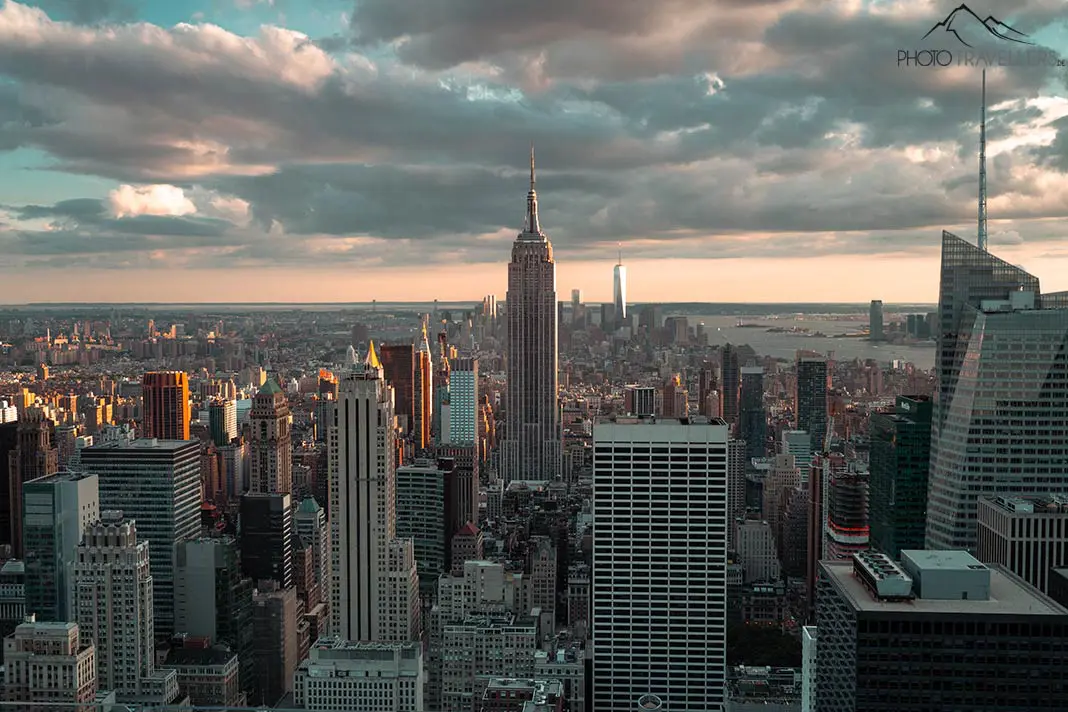
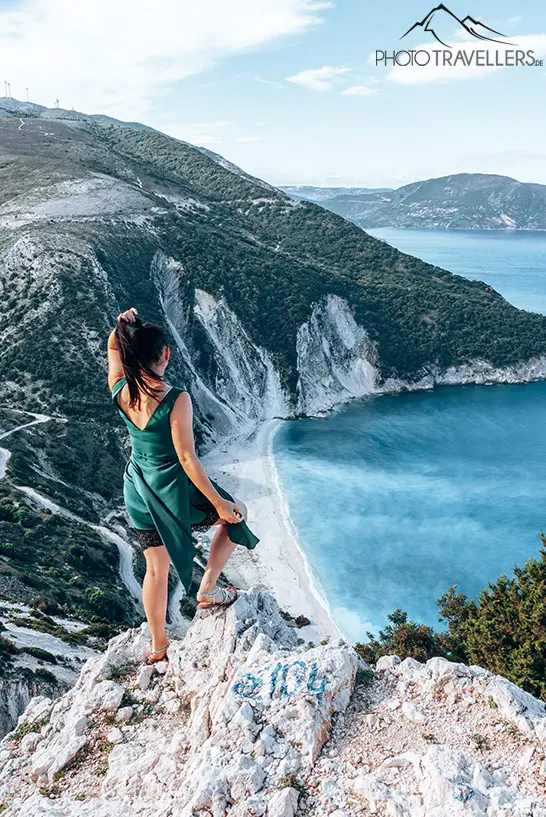
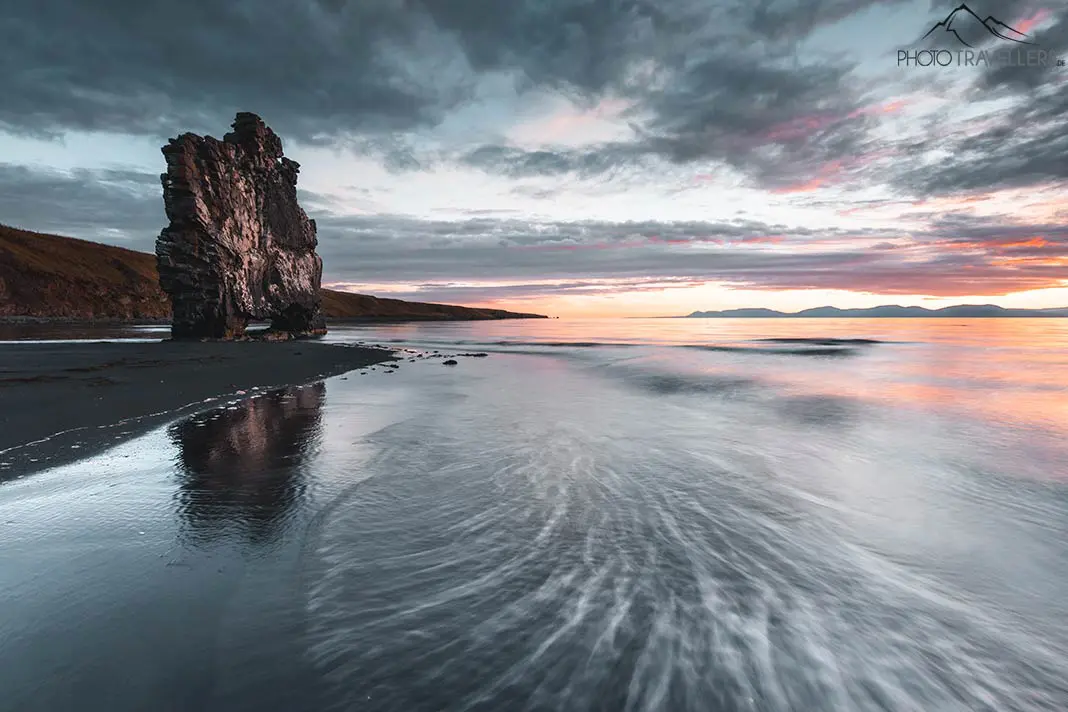
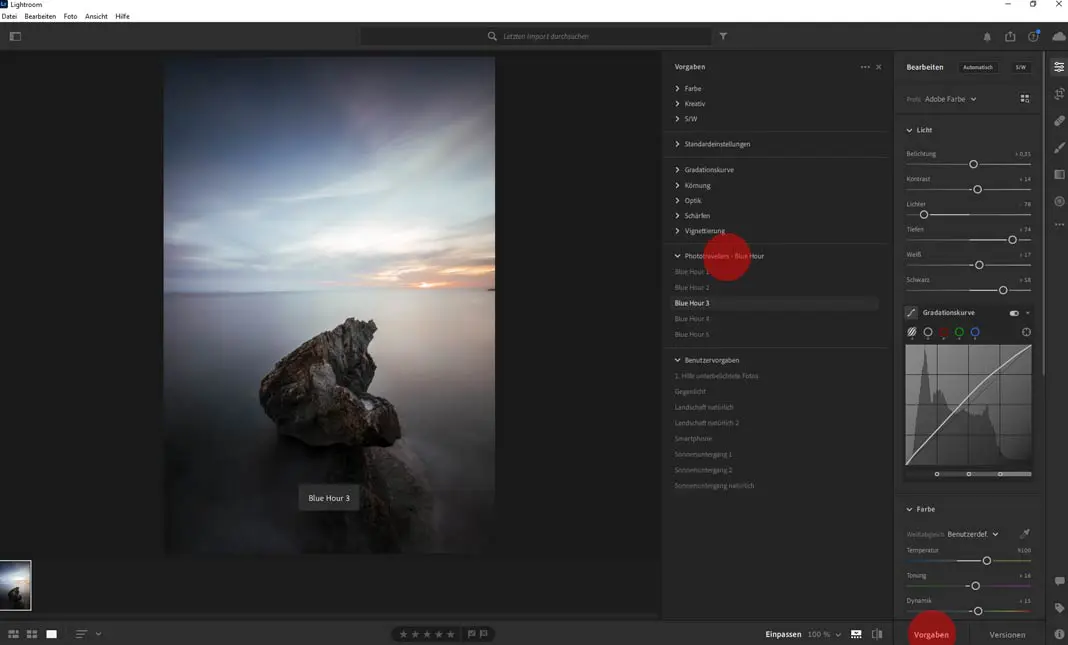
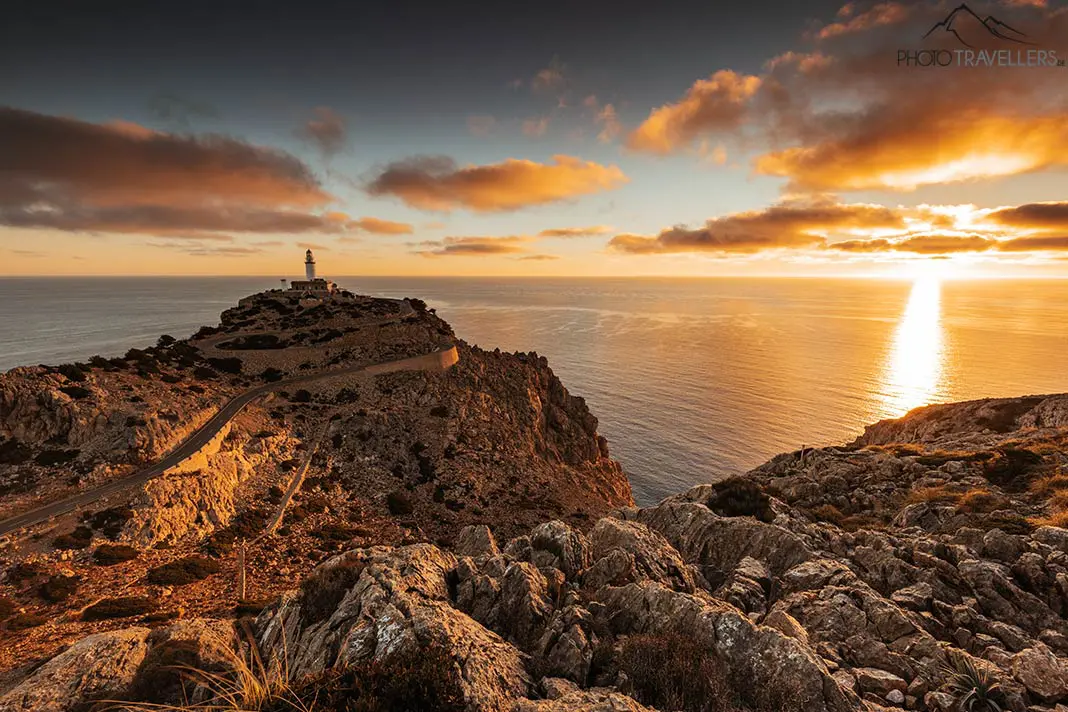 With the “Lightroom Preset Blue Hour 3” the photo turns into this great piece of art
What Lightroom versions are available?
Lightroom is available in a free version for smartphone with some limitations (I call the free smartphone version here in the article “Lightroom Mobile“).
As a user of Lightroom Mobile (officially “Adobe Lightroom Photo Editor“), you install the same app on your smartphone as users of the paid versions. However, less functions are available to you in the free version on the smartphone.
Among other things, in the free version you have to do without the raw editing, the repair brush, some correction tools, the geometry tools, the synchronization of presets and profiles and the cloud storage.
For amateur photographers who only occasionally edit a smartphone image for the web, Lightroom Mobile is still one of the top image editing programs. And best of all: You can also use my filters with the free Lightroom version.
As a smartphone user you can download Lightroom here and use it after registration for free:
To use all features of Lightroom (LR), you need to buy a subscription. Currently there are three subscription models.
As a user of the Lightroom subscription (11.89 euros per month), you get unrestricted access to the cloud version (officially “Photoshop Lightroom“). With the cloud version, you edit your photos on your smartphone, tablet, and desktop or on the web. All changes (and installed presets) are automatically synced in the cloud and available to you on all devices. In the cloud you get 1 TB of storage for about 200,000 JPEG files.
As a user of the Photo subscription (11.89 euros per month), you also get unrestricted access to the cloud version. However, you only have 20 GB of storage for about 4,000 JPEG files in the cloud. In addition to the cloud version of Lightroom, you can also use the desktop/laptop version (officially called Photoshop Lightroom Classic) and the desktop version of the professional image editing program Photoshop (not to be confused with “Photoshop Lightroom”).
With 1 TB of storage in the cloud, you’ll pay 23.79 euros per month for the Photo Subscription with Lightroom, Lightroom Classic, and Photoshop.
Additional cloud storage space can be booked starting at 5.95 euros per month and terabyte.
Here you can find an overview of all Lightroom versions and the respective prices:
| LR Mobile | LR Subscription (1TB) | Photo subscription (20B) | Photo subscription (1TB) | |
|---|---|---|---|---|
| Price/ month | free | 11,89 € | 11,89 € | 23,79 € |
| Cloud storage | – | 1 TB | 20 GB | 1 TB |
| LR on the smartphone | yes, limited | yes | yes | yes |
| LR Classic | no | no | yes | yes |
| Photoshop for the desktop | no | no | yes | yes |
Tip: We use the Foto subscription for 11.89 euros a month (142.68 euros a year). At Amazon, the photo subscription is sometimes a little cheaper (here check price*).
For whom are presets suitable (and for whom not)
I’ll keep it short: If you’re looking for a “one-click solution” to quickly edit your photos, I have to disappoint you. Even with the best presets in the world, you still have to adjust your images (95% of the time). Please don’t let anyone tell you otherwise.
At least the exposure, the white balance (temperature) and the gradation curve often have to be changed. The only exception: templates that promise a natural touch in normal lighting conditions deliver a good to perfect result 80% of the time in my experience..
A preset is always developed on the basis of an image or a similar series of images. If the subject and lighting conditions differ greatly from these templates, the preset will probably not achieve the desired result. Therefore it is important to develop many presets based on different image series (and to have them available in the library). So it doesn’t make sense to use a filter for the sunset for a photo of the beach in daylight.
You should pay attention to the following
Depending on the lighting situation and the subject, you may have to work with the digital gradient filter (shortcode M) and/or the correction brush (shortcode K) after activating a preset. This works in all paid Lightroom versions, so even on the smartphone.
Photographers use both tools far too rarely. Yet graduated filters and correction brushes are powerful tools in image editing.
Presets give you a rough direction in image processing or digital development with Adobe Lightroom. For the final finish of your images you are responsible as a photographer. However, this is usually only a few clicks.
With good filters that show you the way during development, you save an enormous amount of time and get the best results out of your photos.
The best results you achieve with photos in the RAW format (more info about the Raw format). Every system camera (DSLM) and single-lens reflex (DSLR) saves photos in raw format (commonly called “raw”), if desired. Some smartphones also optionally save photos in Raw format. The raw data from the camera or smartphone are – unlike jpg files – not internally processed and not compressed, so they offer more reserves for image processing.
Of course you can also edit your normal photos from the smartphone (Jpg; with Apple also HEIC) with Lightroom. However, you don’t have as many options for image editing here.
100 Lightroom Presets for Travel and Landscape Photographers
We provide you here 100 Lightroom presets for travel and landscape photographers. I have developed the filters for the following situations:
- Arctic Landscape (10 Looks)
- Black and White (5 Looks)
- Blue Hour (10 Looks)
- Cinematic (5 Looks)
- Colorful (10 Looks)
- Deep Woods (5 Looks)
- Drone (5 Looks)
- Golden Beaches (10 Looks)
- High Key (5 Looks)
- Low Key (5 Looks)
- Moody (10 Looks)
- Natural (10 Looks)
- Sunset (10 Looks)
Get all Lightroom presets for Lightroom Mobile, Lightroom, and Lightroom Classic for laptops, desktops, and smartphones. Our presets are available for Lightroom Classic CC 7.3 (release date April 2018) and for the free Lightroom app on smartphones. Each preset consists of two files. One is for installation on the phone (.dng), the other for use on the computer (.xmp). Older Lightroom versions (up to Lightroom 7.2) use the lrtemplate format (which we don’t supply). You can convert .xmp files to .lrtemplate files via a few workarounds.
You are only interested in one or two of my preset themes? You can buy all themes (each with 5 or 10 different looks) individually for 7.95 euros* or 14.95 euros*. If you decide to buy the entire package, you save 54 percent. Instead of 152,35 Euro* you pay for the entire package with 100 great looks for your photos only 69,95 Euro*.
Don’t buy a pig in a poke! You only want to try out one theme area? If you decide to buy the complete package with 100 presets after purchasing a single theme, the price for the complete package is reduced by the price of the single package. The download includes an individual voucher code that you can redeem for the complete package.
In addition, our satisfaction promise also applies here. If you do not achieve the desired result with my LR templates or if you have technical difficulties with the installation, you get your money back up to 14 days after purchase. You can test the filters without any risk.
Get free presets: Sign up here for our Newsletter and get five free presets. Immediately after signing up, you will receive an email with the link to download 😊. So you can try out whether the presets fit your photos and whether everything works with the installation.
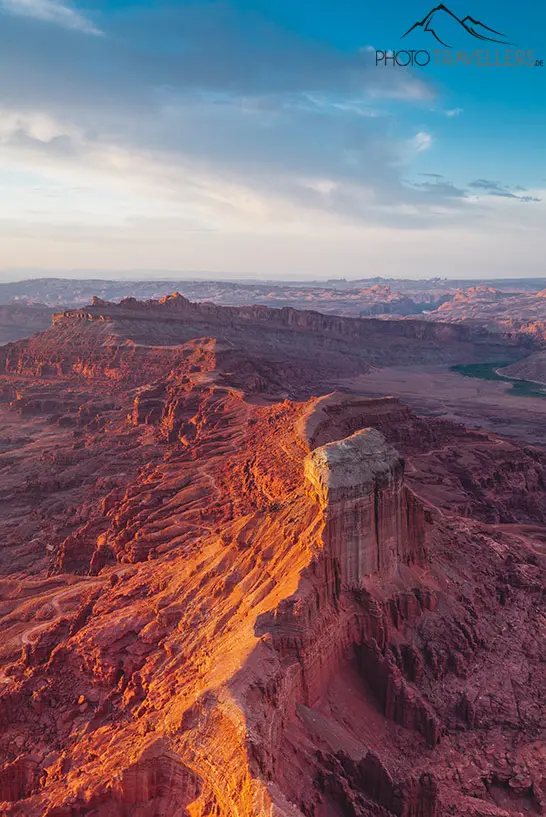
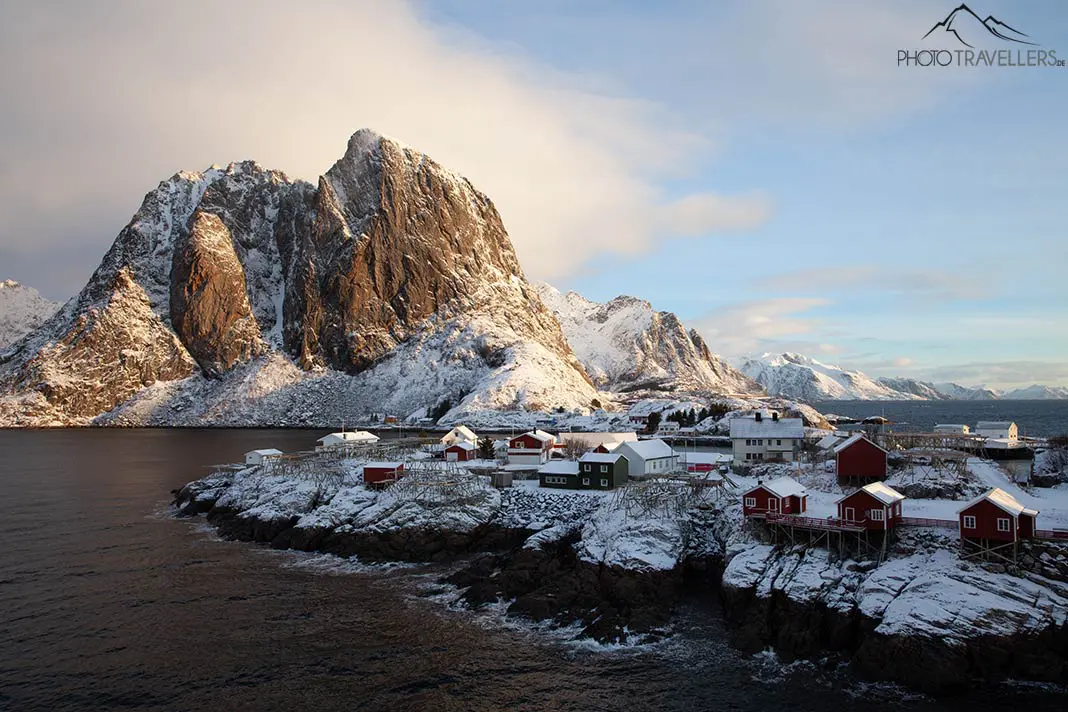
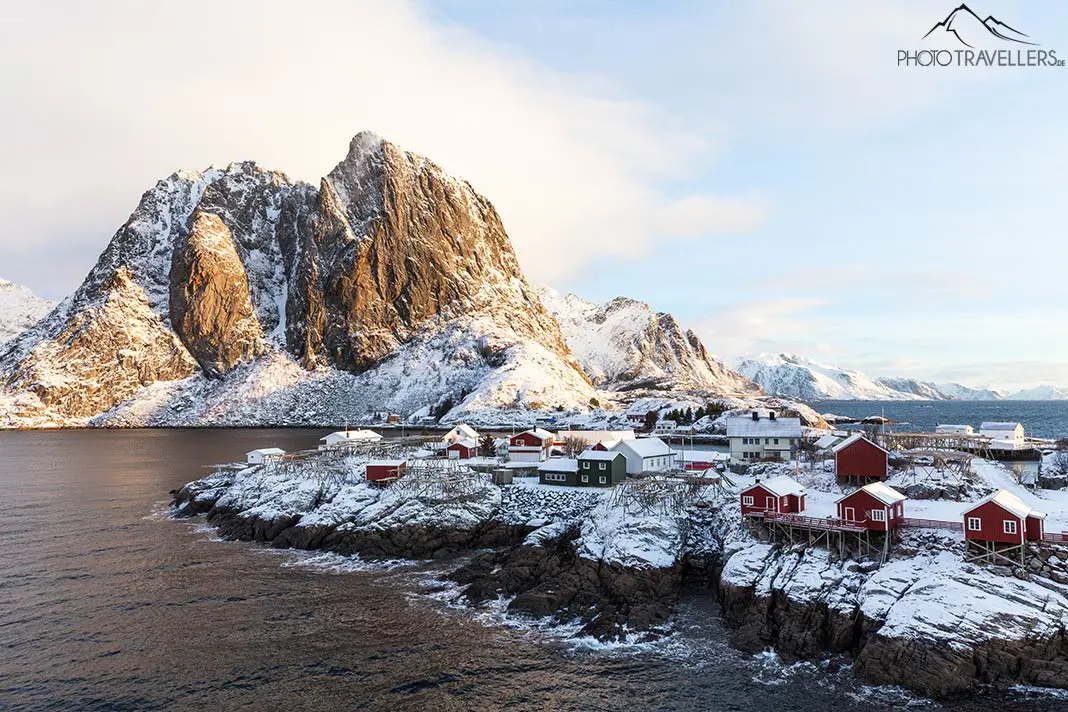
Arctic Landscape
Whether Island, Norway, Canada or Germany in winter: My Arctic Landscape templates (with 10 looks) will turn your photos from the far north into real winter wonder pictures.


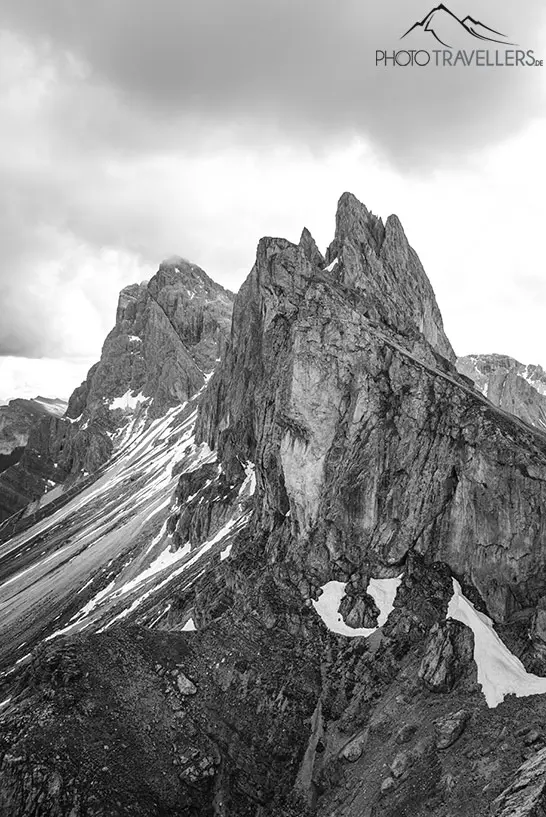
Black and White
There are simply those situations where only black and white shots look impressive. Especially designed for landscape photographers is my series Black and White (with 5 looks).

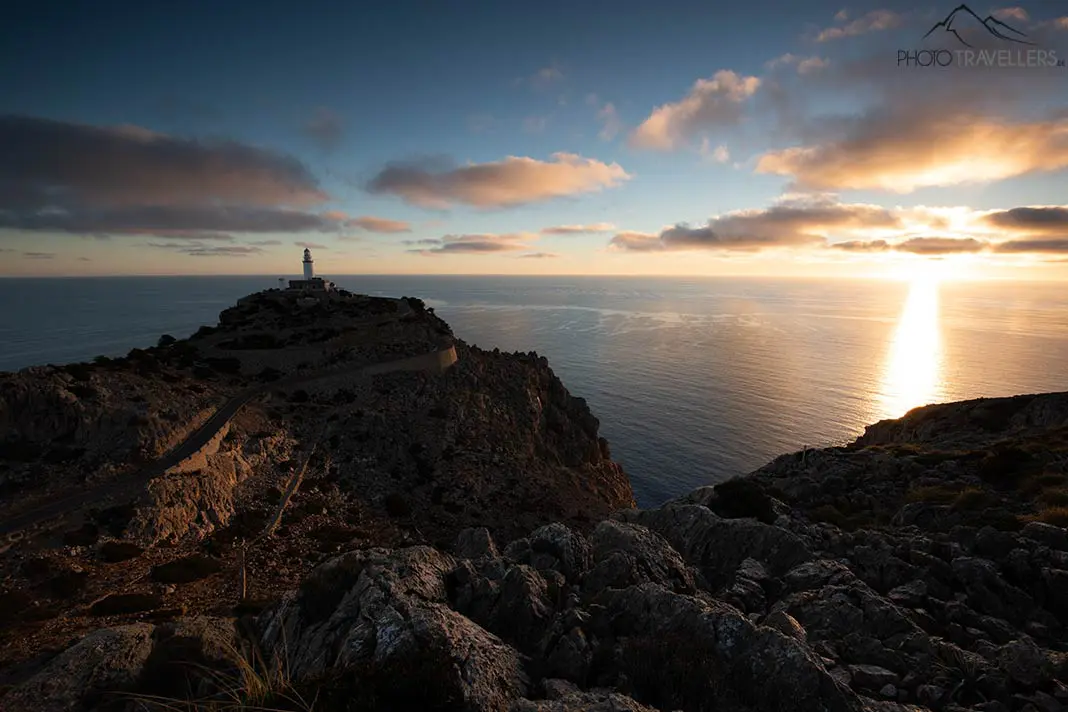
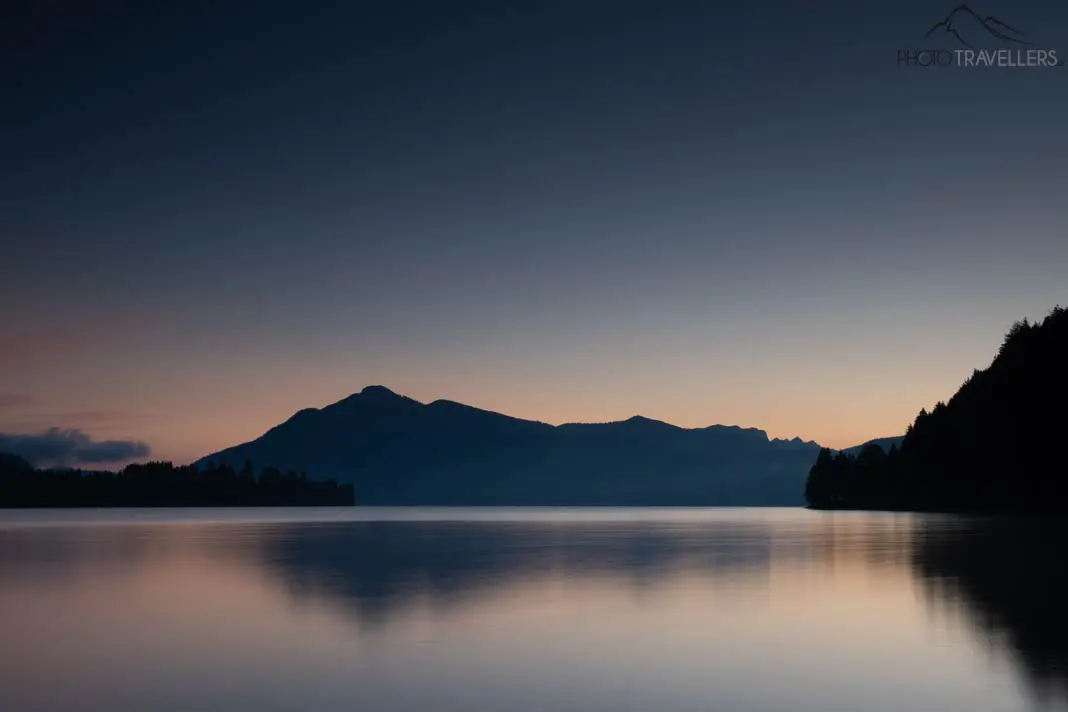
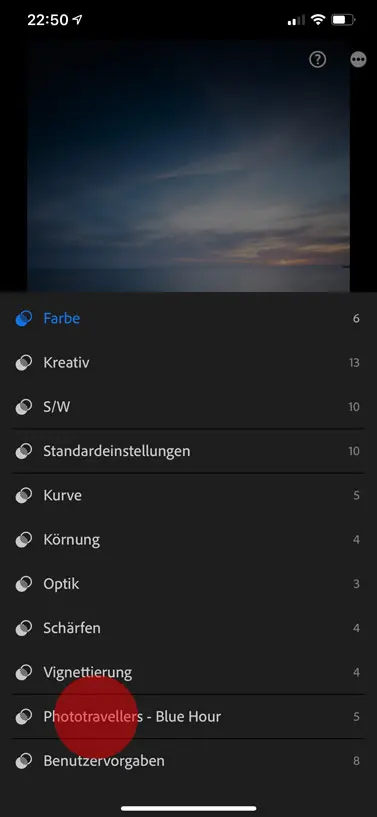
Blue Hour
Blue hour is one of the most beautiful times of the day to photograph. My Blue Hour presets (with 10 looks) give your photos the finishing touch.
Cinematic
Cinematic movies have a very special look – and that’s exactly what I imitate with my Cinematic presets (with 5 looks).
Colorful Landscape
Sometimes we can’t believe at all with which colors nature captivates us. For such situations I have developed the presets Colorful Landscape (with 10 looks).
Deep Woods
Do you love deep forests as much as we do? Especially in the morning and evening you will find countless exciting photo motifs in the forest. To give your forest photos the right look, use my presets from the Deep Woods series (with 5 looks).
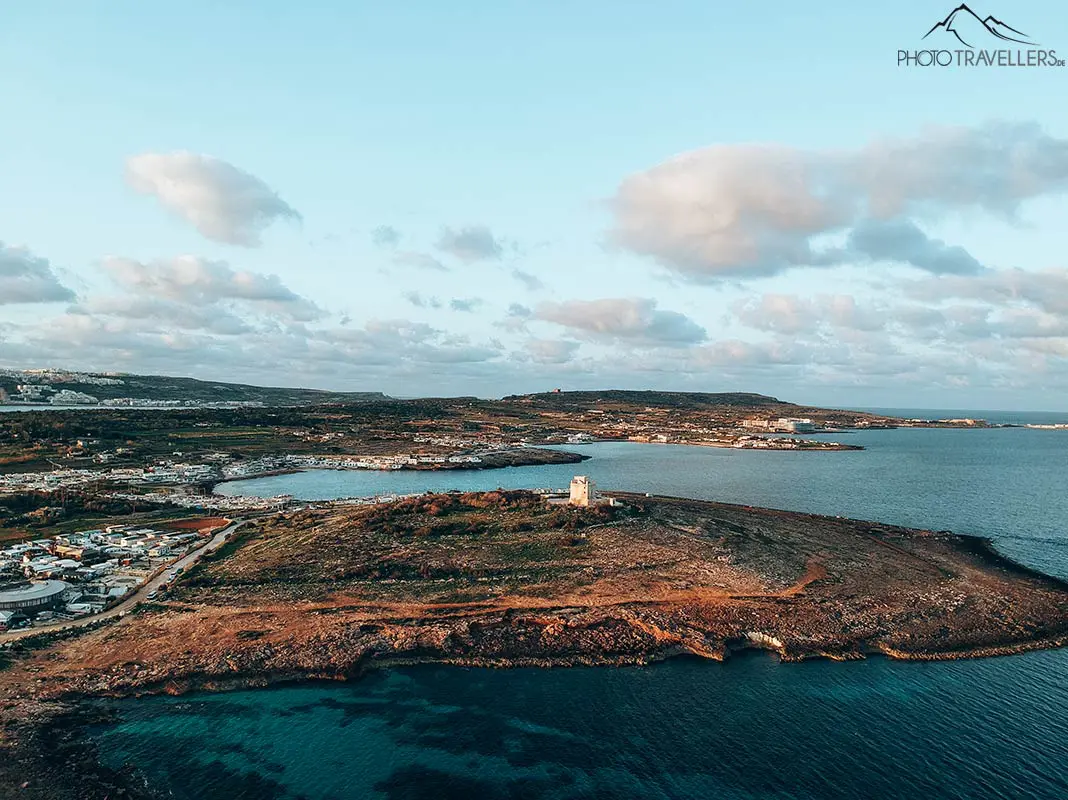
Drone
With my Lightroom presets Drone (with 5 looks) you give your drone photos a very special look.

Golden Beaches
You like to loll around in the sun on the beach? Then you will love my presets Golden Beaches (with 10 looks).
High Key
Hey-key photography is dominated by bright hues, soft light and low contrasts. My series High Key (with 5 looks) will inspire your Instagram followers.
Low Key
Low-key photography is the exact opposite of high-key photography. My presets from the Low Key series (with 5 looks) transform your photos into gloomy masterpieces with a special glow.

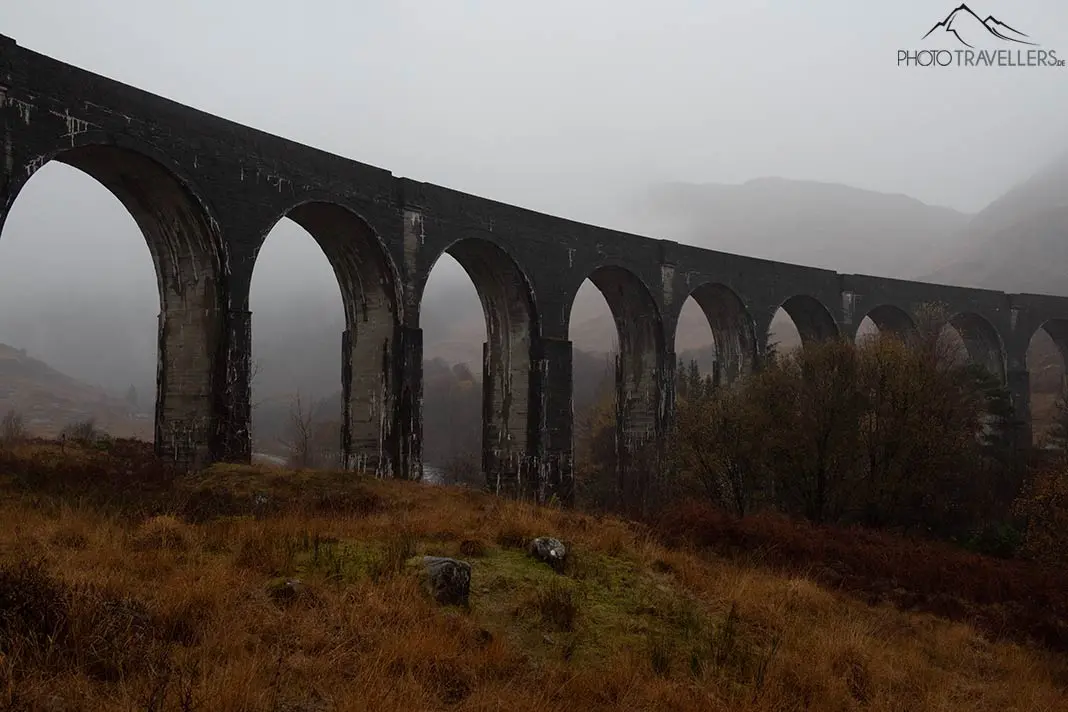
Moody
Have you ever been out in the forest in fog? Or have you traveled through Scotland? My presets Moody (with 10 looks) are especially suitable for mystical places.

Natural
We love the naturalness. Our photos on the blog reflect reality. Are you also a fan of natural colors and contrasts? Then my presets Natural (with 10 looks) are just right for you and your pictures. The filters are also ideal for adding even more brilliance to your smartphone photos.
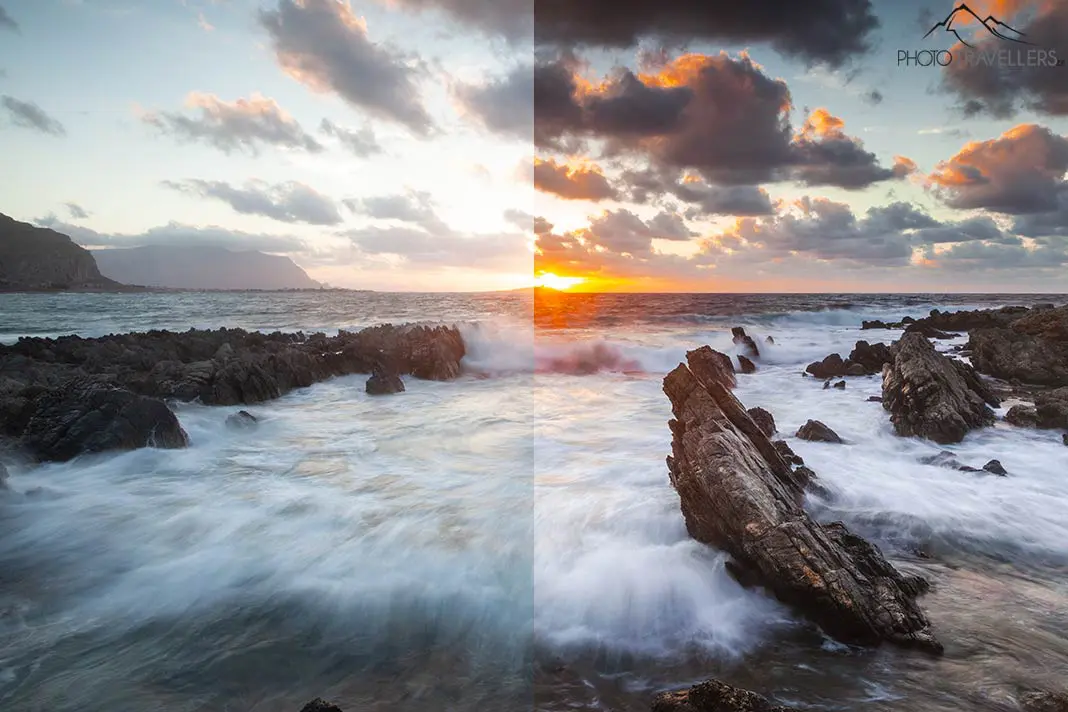
Sunset
What could be more beautiful than a colorful sunset (or sunrise). For all landscape photographers who share our passion for spectacular sunrises and sunsets, my presets Sunset (with 10 looks) are the first choice.
Save 54 percent with the complete package
If you decide for the complete filter set, you pay instead of 152,35 Euro* only 69,95 Euro* and save so 54 percent.
How to install my Lightroom presets
Lightroom Classic (Classic version on desktop/laptop)
In Lightroom Classic for Desktop/Laptop you install my presets with a few clicks:
- Save the presets on your laptop/computer (and remember the location)
- Unzip (decompress) the folders
- Open Lightroom Classic
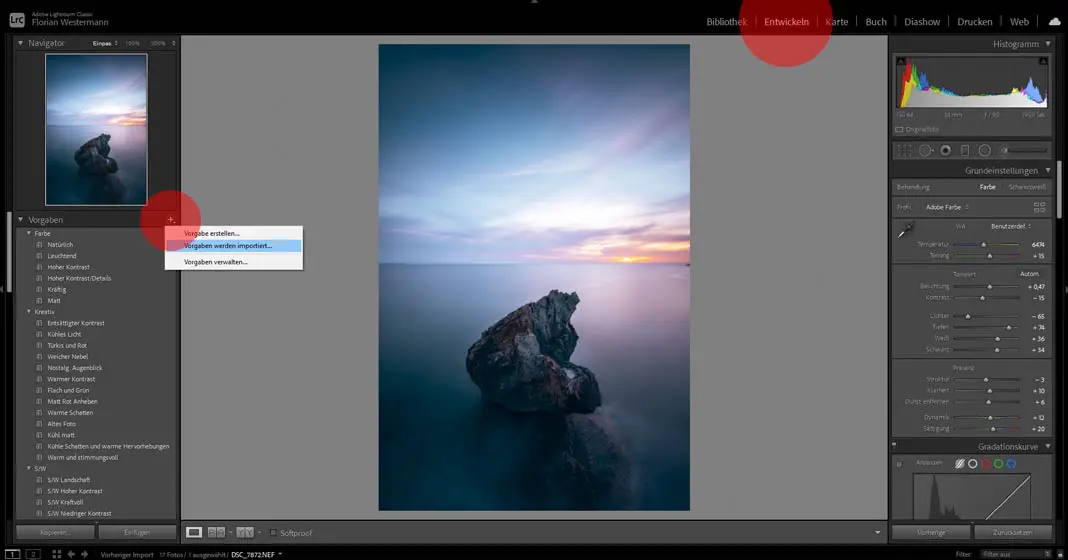
- Switch to the “Develop” mode in the top bar.
- Click the “Plus icon” next to “Defaults” on the left.
- In the window you now click on “Defaults will be imported”.
- Now navigate to the folder on your laptop/computer where the presets are stored
- Open here the subfolder Desktop.
- Mark all xmp files in the folder (hold down the shift key)
- Click on Import.
- The looks are now ready for use
Each preset consists of two files. One is for installation on the phone (.dng), the other is for use on the computer (.xmp). On the computer you need the .xmp file (saved in the “Desktop” subfolder after downloading my filters).
Lightroom (cloud version on laptop/ desktop)
Adobe Lightroom (without the addition “Classic”) is the cloud-based version of the image editing software. Lightroom runs both on the computer/laptop and on the smartphone. Here I explain how to install my presets on the laptop or the desktop .
- Save the presets on your laptop/computer (and remember the location)
- Unzip (decompress) the folders
- Open Lightroom
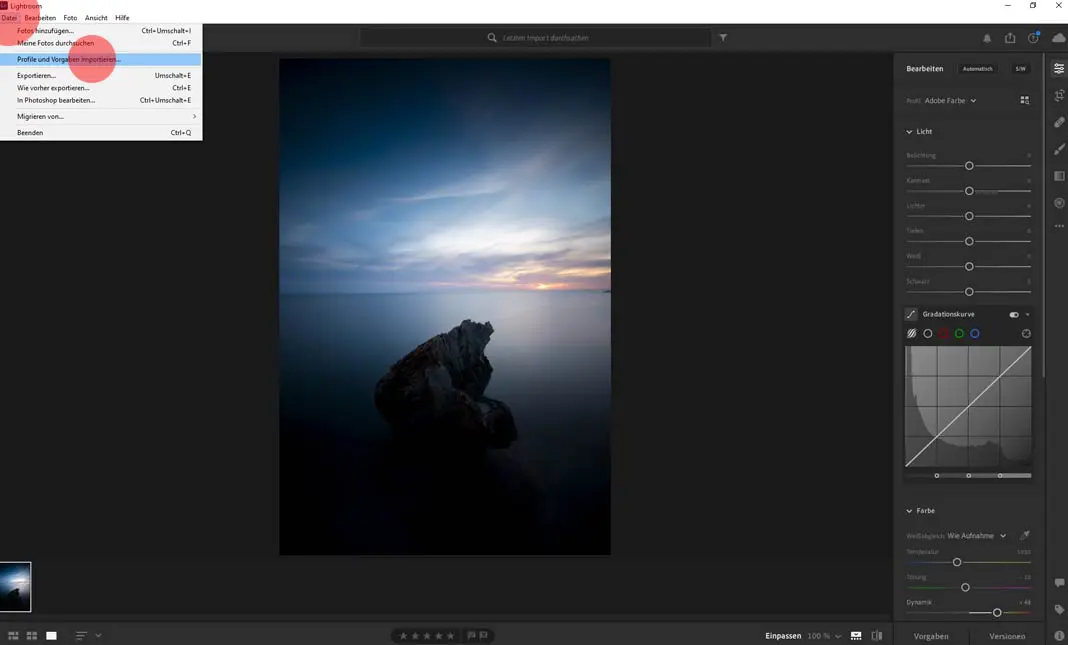
- Click on “File” in the upper left corner.
- Here you select “Import profiles and presets”.
- Navigate to the folder on your laptop/computer where the presets are stored
- Mark all xmp files in the Desktop subfolder (hold down the Shift key)
- Click on Import.
- You can now find my presets in the lower right corner of Lightroom (possibly only after restarting the software) under “Presets”.
Each preset consists of two files. One is for installation on the phone (.dng), the other is for use on the computer (.xmp). Here you need the .xmp file in the Desktop subfolder.
Lightroom (cloud version on smartphone)
With a paid Lightroom subscription: If you have already installed the Presets in Lightroom on the laptop or desktop, they will be available automatically in the Lightroom app on the smartphone after a few moments.
Here I explain how to use your new filters on your smartphone. Below you’ll learn how to install my filters on your smartphone without going through the computer (this also applies to users of the free Lightroom version).
- Open the Lightroom app on your smartphone
- Open the Library.
- Select a photo to edit
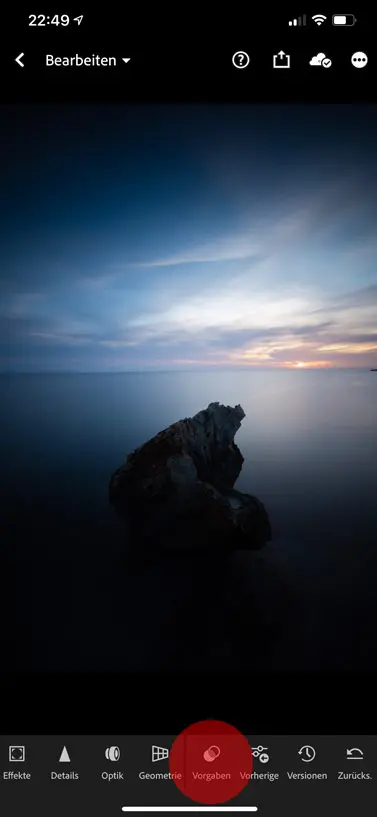
- Scroll right in the display bar at the bottom to the “Preferences” item.
- Select in the presets the desired preset theme, for example “Blue Hour”.
- Now you can use the individual presets from the respective theme
- Confirm your selection with the small hook right below
With and without Lightroom subscription: Do you want to install my filters directly on the smartphone in the Lightroom app (i.e. without going via the computer)? This is a little more cumbersome than on the desktop / laptop, but also works without a paid subscription. I’ll tell you how to do that now:
Each preset consists of two files. One is for installation on the cell phone (.dng), the other is for use on the computer (.xmp). Here you need the .dng file in the Mobile subfolder.
Install presets on iPhone
- First, you need the Lightroom app (download) on your iPhone.
- Create a free Lightroom account (Adobe ID)
- Upload the presets (zip folder) to the free Apple app “Files” (you can back up the folder directly to your iPhone or to iCloud).
- From iOS 11 (released September 2017): Press on the Zip folder and select “Decompress“.
- Open the unzipped folder with the individual Lightroom templates
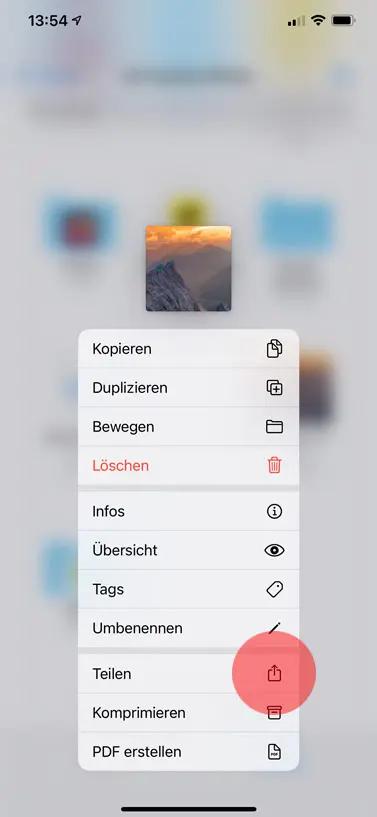
- Select the respective preset (a photo in the form of a .dng file)
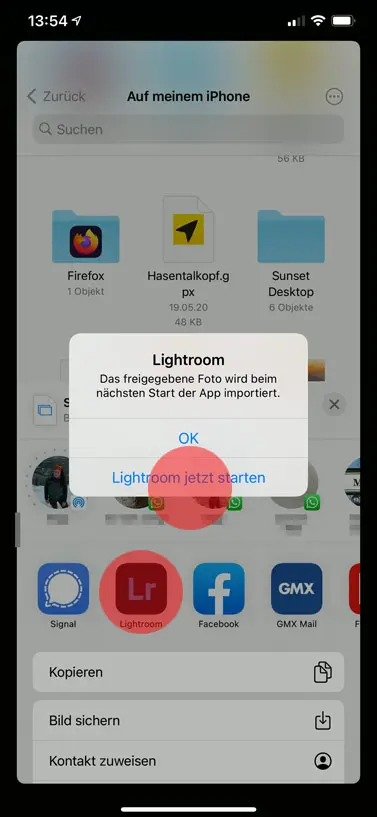
- Click on “Share” and select the app “Lightroom” (this is not the only option, but the easiest one)
- Click on “Start Lightroom now“.
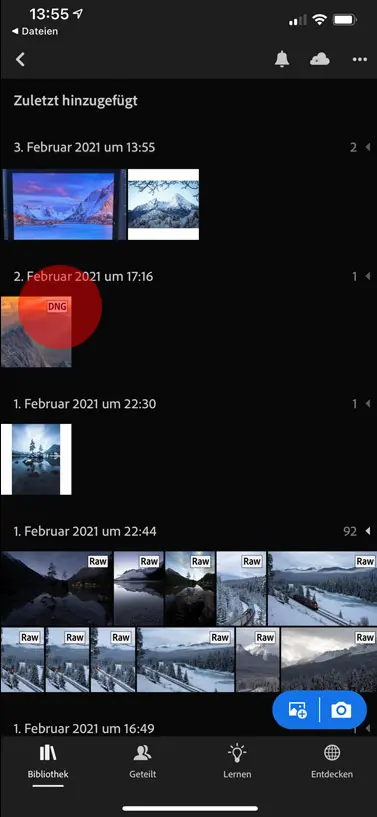
- You see the preset – marked with DNG – now in your Lightroom library
- Open the file with a short click
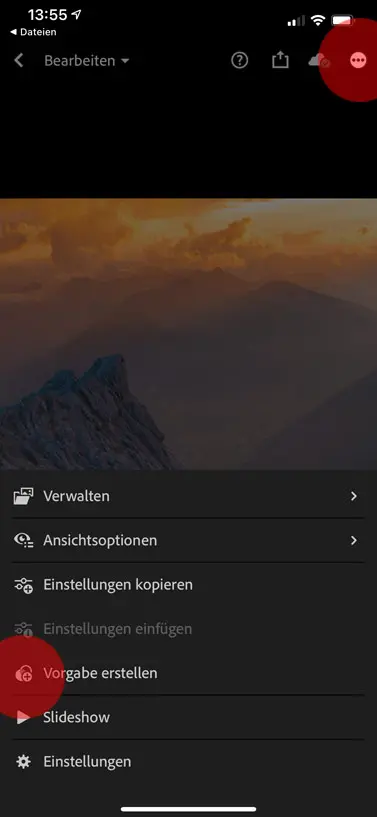
- Now click on the three dots in the upper right corner
- Select “Create preset”.
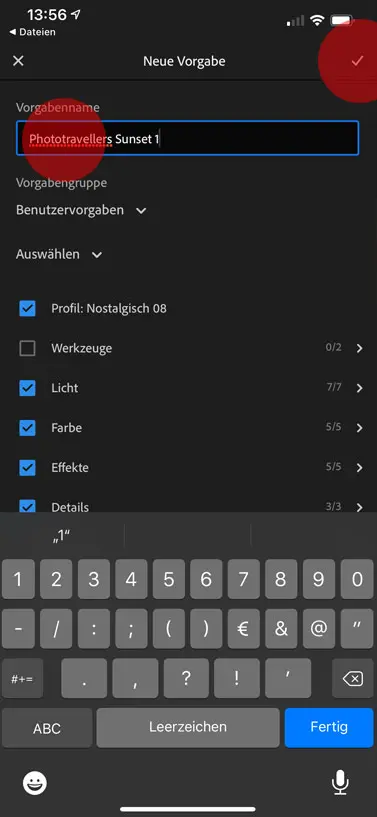
- Give the preset a name (“preset name”) and optionally save it in a “preset group” (which could be called Phototravellers Presets); also mark all options here
- Confirm your selection with the small hook right above
- The preset is now installed on your iPhone and ready for use
- Repeat these steps for all individual presets and give all presets a new name
- How you use the filters, I already revealed earlier in the article.
Install Presets in Android
- First, you need the Lightroom app (download) on your smartphone.
- Create a free Lightroom account (Adobe ID)
- Download the presets (zip folder) to your smartphone or to the cloud
- Open the file management and select the download folder with the presets, like “My Files” at Samsung
- Use UNZIP to extract the folder or long press on the folder and select “Extract“.
- Choose a directory for the folder with the templates
- Open the Lightroom app.
- Open the library and click on the blue highlighted image with the plus symbol (not on the camera symbol) in the lower right corner.
- Select “From Files“
- Navigate to the unzipped folder with the presets and click on one of the templates.
- You can find the preset – marked with DNG – now in your Lightroom library
- Open the file with a short click
- Now click on the three dots in the upper right corner
- Select “Create preset”.
- Give the preset a name (“preset name”) and optionally save it in a “preset group” (which could be called Phototravellers Presets); also mark all options here
- Confirm your selection with the small hook right above
- The preset is now installed on your smartphone and ready for use
- Repeat these steps for all individual presets and give them all a new name
- How you use the filters, I already revealed earlier in the article.
Create your own presets
If you feel like it and have fun with it, you can easily create your own presets. How do you do that? I’ll tell you here:
Lightroom Classic (Desktop/ Laptop)
- Open Lightroom Classic on your computer
- Select an image from your library (or import it)
- Switch to “Develop” mode
- Edit the photo according to your wishes
- Click on the Plus icon in the “Preferences” tab on the left.
- Click on “Create preset”.
- Give the preset a name and activate all settings that should be saved
- Your own preset now appears under the presets
- With a right click on the preset you can also export the preset (as .xmp file)
Lightroom (Desktop/ Laptop)
- Open Lightroom on the computer
- Select an image from the library and activate the “Edit” function (top right)
- Edit the photo according to your wishes
- Click on “Preferences” at the bottom right.
- Click on the three dots in the new presets window in the upper right corner.
- Click on “Create preset”.
- Give the preset a name and activate all settings that should be saved
- Your own preset now appears among the presets and is automatically applied to all your devices via the cloud
- With a right click on the preset you can also export the preset (as .xmp file)
Lightroom (smartphone with LR subscription)
- Open Lightroom on the smartphone
- Select an image from the library and open the “Edit” function (you may need to select “Edit” from the dropdown menu at the top left)
- Edit the image according to your wishes
- Click on the three dots in the upper right corner.
- Click on “Create preset”.
- Give the preset a name and activate all settings that should be saved
- Your own preset now appears among the presets and is automatically applied to all your devices via the cloud
We wish you now a lot of fun with your new presets for Lightroom 😊.
*All prices are inclusive of VAT